End-to-End BSP Onboarding
Backup Storage Providers (BSPs) provide redundant storage for files in the DataHaven network, receiving files from Main Storage Providers (MSPs) and submitting proofs of storage.
This tutorial walks through the entire process of bringing a BSP node online, from spinning up the node and selecting the correct chain spec to inserting your private key into the node’s keystore and registering your BSP on-chain. By the end, you will have a fully verified BSP that joins the DataHaven network, accepts storage assignments, and participates in StorageHub’s storage-proof lifecycle.
Prerequisites
Before you begin, ensure you have the following:
- Linux operating system
-
Docker and Docker Compose installed and running
Docker installation instructions
To install Docker properly on Linux, make sure to do the following:
-
Install Docker
-
Add your user to docker group (so you don't need sudo)
-
Apply group changes:
-
Verify Docker is working:
-
-
A BCSV key of scheme ECDSA (a 32 byte private key) for the BSP node's on-chain identity and signing
- Sufficient account balance for deposits and collateral
- Stable network connection
- Open network ports (30333, optionally 9944)
Hardware Requirements
BSPs have similar hardware requirements to MSPs as they store backup data and must reliably submit proofs of storage.
| Component | Requirement |
|---|---|
| CPU | 8 physical cores @ 3.4 GHz (Intel Ice Lake+ or AMD Zen3+) |
| RAM | 32 GB DDR4 ECC |
| Storage (System) | 500 GB NVMe SSD (chain data) |
| Storage (User Data) | 1 TB NVMe SSD or HDD (minimum) |
| Network | 500 Mbit/s symmetric |
The following are some important considerations:
- Use separate storage volumes: Keep chain data and user data on separate volumes for better I/O performance.
- Plan for storage growth: Ensure user data storage is easily expandable.
- Limit disk usage: Set
max-storage-capacityflag to 80% of available physical disk space to leave headroom for filesystem overhead and temporary files. - Optimize for cloud: Run BSPs on cloud VPS with dedicated storage volumes.
- Ensure network reliability: Maintain stable network connectivity for timely proof submissions.
Deposit Requirements
The formula for the deposit is as follows:
SpMinDeposit + (capacity_in_gib * DepositPerData) + buffer
SpMinDeposit: Base deposit of 100 MOCKcapacity_in_gib: The set GiB capacity of your hardwareDepositPerData: 2 MOCK per GiBbuffer: An additional safety margin
Examples:
- 800 GiB capacity: 100 + (800 × 2) = 1,700 MOCK required (1,800 MOCK recommended)
- 1.6 TiB capacity: 100 + (1,638 × 2) = 3,376 MOCK required (3,500+ MOCK recommended)
The deposit is held (reserved) from your account when you start the BSP registration process and remains held while you operate as a BSP. The deposit is returned when you deregister as a BSP.
Note
Your BSP account must be funded before BSP registration.
Project Structure
This is how the project structure will look like, once everything is set up.
datahaven-bsp-node/
├── datahaven-node
├── bsp-data
│   ├── keystore
│   ├── chains
│   │   ├── datahaven_testnet
│   │   │   ├── db
│   │   │   ├── frontier
│   │   │   └── network
│   │   └── datahaven_stagenet_local
│   ├── bsp_peer_manager
│   ├── storage
│   └── storagehub
├── bsp-storage
│   └── storagehub
│       ├── file_storage
│       └── forest_storage
├── Dockerfile
├── docker-compose.yml
├── datahaven-testnet-raw-specs.json
└── bsp.log
Project Setup
Before running a BSP node, you will need to obtain the datahaven-node client binary and the chain specifications for the network you want to join.
-
Create a
datahaven-bsp-nodefolder: -
Download the latest client release (v0.20.0) of the
datahaven-nodebinary from the Releases section of the DataHaven repo. Make sure to download it in the root of yourdatahaven-bsp-nodefolder. -
Download the testnet chain specs and save them to your project root as
datahaven-testnet-raw-specs.json. The specs determine the DataHaven network your BSP uses.Either manually download the testnet chain specs and use SCP to upload the specs to your server:
scp /path/to/your/chainspec.json ubuntu@INSERT_SERVER_IP:~/datahaven-bsp-node/datahaven-testnet-raw-specs.jsonor download the specs to your server directly via terminal:
Configure Docker for the BSP Node
In this section, you’ll create the Dockerfile, docker-compose.yml, and .dockerignore needed to run the node, mount your keystore, load the chain spec, and expose the required ports. After this step, your BSP can run cleanly in an isolated, reproducible container that is easy to start, stop, and upgrade.
The datahaven-node binaries published in the DataHaven repository are precompiled Linux x86-64 binaries, which macOS users with Apple Silicon chips cannot compile natively. Docker solves this as well, via emulation.
-
In the root of your project, create a
Dockerfilefile. -
Add the following code:
Dockerfile# Note: This Dockerfile is architecture-agnostic. Use # `docker build --platform=linux/amd64` on Apple Silicon # so Rosetta can emulate x86-64 binaries. FROM ubuntu:22.04 # Install runtime dependencies for datahaven-node RUN apt-get update && apt-get install -y \ libpq5 \ ca-certificates \ && rm -rf /var/lib/apt/lists/* # Copy the datahaven-node binary into the image COPY datahaven-node /usr/local/bin/datahaven-node RUN chmod +x /usr/local/bin/datahaven-node # Default entrypoint: just run the node ENTRYPOINT ["datahaven-node"]This
Dockerfilebuilds a minimal Ubuntu-based image containing thedatahaven-nodebinary and its required runtime libraries. It installs only the necessary dependencies, copies the node executable into the container, and marks it as runnable. The default entrypoint runsdatahaven-nodedirectly, allowing the container to behave like a fully configured BSP node. -
Create a
.dockerignorefile. -
List the
datafolder within the.dockerignorefile:This way the
bsp-dataandbsp-storagefolders and their contents won't get included in the Docker image. -
Build the Docker image:
The image name can be anything; This tutorial, uses
datahaven-bsp:latest.(Optional) Spin up the BSP node now to see what the output is like.
Going forward, you won't run the BSP this way, but right now you could run a BSP node in the background through the
datahaven-bspDocker container with a command like this:docker run -d \ --name datahaven-bsp \ --restart unless-stopped \ -v "./preview-data":/data \ datahaven-bsp:latest \ --provider \ --provider-type bsp \ --max-storage-capacity 32212254720 \ --jump-capacity 5368709120 \ --storage-layer rocks-db \ --storage-path /dataTo display this container's logs in terminal, run:
Note
To stop displaying the logs in terminal run
Ctrl+C, but keep in mind that it won't actually stop the container from running.The logs output should be something like:
docker run -d \ --platform=linux/amd64 \ --name datahaven-bsp \ --restart unless-stopped \ -v "./preview-data":/data \ datahaven-bsp:latest \ --provider \ --provider-type bsp \ --max-storage-capacity 32212254720 \ --jump-capacity 5368709120 \ --storage-layer rocks-db \ --storage-path /data2025-11-17 14:29:41 DataHaven Node 2025-11-17 14:29:41 ✌️ version 0.11.0-ae9eef73070 2025-11-17 14:29:41 ❤️ by Moonsong Labs, 2025-2025 2025-11-17 14:29:41 📋 Chain specification: DataHaven Stagenet Local 2025-11-17 14:29:41 🏷 Node name: delirious-driving-2308 2025-11-17 14:29:41 👤 Role: FULL 2025-11-17 14:29:41 💾 Database: RocksDb at /Users/aljosamakevic/Library/Application Support/datahaven-node/chains/datahaven_stagenet_local/db/full 2025-11-17 14:29:42 🔨 Initializing Genesis block/state (state: 0x0724…5128, header-hash: 0x75d8…cf43) 2025-11-17 14:29:42 👴 Loading GRANDPA authority set from genesis on what appears to be first startup. 2025-11-17 14:29:42 👶 Creating empty BABE epoch changes on what appears to be first startup. 2025-11-17 14:29:42 Using default protocol ID "sup" because none is configured in the chain specs 2025-11-17 14:29:42 🏷 Local node identity is: 12D3KooWSN4p5iCahCMArGe9ygorbJFCUGwKUk3iZ7XugCxQdjGP 2025-11-17 14:29:42 Running libp2p network backend 2025-11-17 14:29:42 Starting as a Storage Provider. Storage path: Some("/data"), Max storage capacity: Some(32212254720), Jump capacity: Some(5368709120), MSP charging period: None 2025-11-17 14:29:42 💾 StorageHub's File Transfer Service starting up! 2025-11-17 14:29:42 Emitting RetryBucketMoveDownload event to check for pending bucket downloads 2025-11-17 14:29:42 No listener for emitted event. 2025-11-17 14:29:42 💻 Operating system: macos 2025-11-17 14:29:42 💻 CPU architecture: aarch64 2025-11-17 14:29:42 📦 Highest known block at #0 2025-11-17 14:29:42 〽️ Prometheus exporter started at 127.0.0.1:9615 2025-11-17 14:29:42 Running JSON-RPC server: addr=127.0.0.1:9944,[::1]:9944 2025-11-17 14:29:42 🥩 BEEFY gadget waiting for BEEFY pallet to become available... 2025-11-17 14:29:42 Blockchain service state store path: /Users/aljosamakevic/Library/Application Support/datahaven-node/storagehub/blockchain_service/ 2025-11-17 14:29:42 BSP peer manager DB path: /Users/aljosamakevic/Library/Application Support/datahaven-node/bsp_peer_manager 2025-11-17 14:29:42 💾 StorageHub's Blockchain Service starting up! 2025-11-17 14:29:42 Loaded 0 BSP peers from database 2025-11-17 14:29:42 Successfully initialized BSP peer manager 2025-11-17 14:29:42 Download state store path: /var/folders/kf/l65jsx8s2cq3rx2rqy7spcc00000gn/T/storagehub/storagehub/download_state/ 2025-11-17 14:29:42 Starting BSP tasks 2025-11-17 14:29:47 💤 \x1b[37m\x1b[1mIdle\x1b[0m (\x1b[37m\x1b[1m0\x1b[0m peers), best: #\x1b[37m\x1b[1m0\x1b[0m (0x75d8…cf43), finalized #\x1b[37m\x1b[1m0\x1b[0m (0x75d8…cf43), }If you have spun up this
datahaven-bspcontainer, prior to the upcoming step, make sure to stop it and remove it: -
Generate node key:
The output should look something like:
docker run --rm datahaven-bsp:latest key generate-node-key12D3KooWRmRC9q1L4sP8dpQwKxHjmKfwEMxDzAH7p8XLbLFbUqJc 9a4f2c8b1d3e5f7a0b2c4d6e8f0a1b3c5d7e9f0a2b4c6d8e0f1a3b5c7d9e1f3a -
In the root of your project create a
docker-compose.ymlfile. -
Add the following code:
Note
This configuration uses your generated node key (
--node-key) and the chain spec you downloaded (--chain). The chain spec file must be mounted into the container viavolumes. If--chainis omitted, the node defaults to DataHaven Local Stagenet.docker-compose.ymlservices: datahaven-bsp: image: datahaven-bsp:latest platform: linux/amd64 container_name: datahaven-bsp ports: - "30334:30333" - "9946:9946" volumes: - ./bsp-data:/data - ./bsp-storage:/data/storage - ./datahaven-testnet-raw-specs.json:/testnet-chain-spec.json:ro command: - "--chain=/testnet-chain-spec.json" - "--node-key=INSERT_NODE_KEY" - "--node-key-type=ed25519" - "--unsafe-rpc-external" - "--rpc-methods=unsafe" - "--name=BSP01" - "--base-path=/data" - "--keystore-path=/data/keystore" - "--provider" - "--provider-type=bsp" - "--max-storage-capacity=1099511627776" - "--jump-capacity=137438953472" - "--storage-layer=rocks-db" - "--storage-path=/data/storage" - "--bsp-upload-file-task" - "--bsp-upload-file-max-try-count=5" - "--bsp-upload-file-max-tip=0" - "--bsp-move-bucket-task" - "--bsp-move-bucket-grace-period=300" - "--bsp-charge-fees-task" - "--bsp-charge-fees-min-debt=1000000000000000000" - "--bsp-submit-proof-task" - "--bsp-submit-proof-max-attempts=3" - "--port=30333" - "--rpc-port=9946" restart: unless-stopped volumes: bsp-data: bsp-storage:Docker Compose makes the setup reproducible, easier to maintain, and safer for operators who shouldn’t need to remember every flag manually. It also ensures the node restarts automatically and mounts persistent storage correctly.
To better understand each of these flags, make sure to check out the BSP CLI Flags guide.
-
Run the BSP:
The output will look something like this:
docker compose up -d[+] Running 2/2 ✔ Network datahaven-bsp-node_default Created ✔ Container datahaven-bsp Started
-
Check BSP's logs:
The output should look something like this (with varying storage capacity depending on the capacity you've set for your machine):
docker compose logs -f | tee bsp.logdatahaven-bsp | 2026-01-08 12:15:34 💻 DataHaven node starting with 8 logical CPU(s) visible to the process datahaven-bsp | 2026-01-08 12:15:34 DataHaven Node datahaven-bsp | 2026-01-08 12:15:34 ✌️ version 0.11.0-unknown datahaven-bsp | 2026-01-08 12:15:34 ❤️ by Moonsong Labs, 2025-2026 datahaven-bsp | 2026-01-08 12:15:34 📋 Chain specification: DataHaven Testnet datahaven-bsp | 2026-01-08 12:15:34 🏷 Node name: BSP01 datahaven-bsp | 2026-01-08 12:15:34 👤 Role: FULL datahaven-bsp | 2026-01-08 12:15:34 💾 Database: RocksDb at /data/chains/datahaven_testnet/db/full datahaven-bsp | 2026-01-08 12:15:36 🔨 Initializing Genesis block/state (state: 0x211e…61b4, header-hash: 0xdbf4…df99) datahaven-bsp | 2026-01-08 12:15:36 👴 Loading GRANDPA authority set from genesis on what appears to be first startup. datahaven-bsp | 2026-01-08 12:15:36 👶 Creating empty BABE epoch changes on what appears to be first startup. datahaven-bsp | 2026-01-08 12:15:36 Using default protocol ID "sup" because none is configured in the chain specs datahaven-bsp | 2026-01-08 12:15:36 🏷 Local node identity is: 12D3KooWQ3fycKkf4X8qgoj4Kd6QSQEiWBD5tPhPPSkzK9KYVW95 datahaven-bsp | 2026-01-08 12:15:36 Running libp2p network backend datahaven-bsp | 2026-01-08 12:15:36 Starting as a Storage Provider. Storage path: Some("/data/storage"), Max storage capacity: Some(32212254720), Jump capacity: Some(5368709120), MSP charging period: None datahaven-bsp | 2026-01-08 12:15:36 💾 StorageHub's File Transfer Service starting up! datahaven-bsp | 2026-01-08 12:15:36 Emitting RetryBucketMoveDownload event to check for pending bucket downloads datahaven-bsp | 2026-01-08 12:15:36 No listener for emitted event. datahaven-bsp | 2026-01-08 12:15:37 💻 Operating system: linux datahaven-bsp | 2026-01-08 12:15:37 💻 CPU architecture: x86_64 datahaven-bsp | 2026-01-08 12:15:37 💻 Target environment: gnu datahaven-bsp | 2026-01-08 12:15:37 💻 CPU: Intel(R) Xeon(R) CPU E3-1245 V2 @ 3.40GHz datahaven-bsp | 2026-01-08 12:15:37 💻 CPU cores: 4 datahaven-bsp | 2026-01-08 12:15:37 💻 Memory: 31990MB datahaven-bsp | 2026-01-08 12:15:37 💻 Kernel: 5.15.0-161-generic datahaven-bsp | 2026-01-08 12:15:37 💻 Linux distribution: Ubuntu 22.04.5 LTS datahaven-bsp | 2026-01-08 12:15:37 💻 Virtual machine: no datahaven-bsp | 2026-01-08 12:15:37 📦 Highest known block at #0 datahaven-bsp | 2026-01-08 12:15:37 〽️ Prometheus exporter started at 127.0.0.1:9615 datahaven-bsp | 2026-01-08 12:15:37 Running JSON-RPC server: addr=0.0.0.0:9946,[::]:36967 datahaven-bsp | 2026-01-08 12:15:37 Blockchain service state store path: /data/storagehub/blockchain_service/ datahaven-bsp | 2026-01-08 12:15:37 🥩 BEEFY gadget waiting for BEEFY pallet to become available... datahaven-bsp | 2026-01-08 12:15:37 BSP peer manager DB path: /data/bsp_peer_manager datahaven-bsp | 2026-01-08 12:15:37 💾 StorageHub's Blockchain Service starting up! datahaven-bsp | 2026-01-08 12:15:37 Pending transactions DB URL not found in configuration or environment variable; running in STANDALONE mode datahaven-bsp | 2026-01-08 12:15:37 Pending transactions will not be persisted or shared across instances datahaven-bsp | 2026-01-08 12:15:37 📦 Node role is STANDALONE; pending transactions will not be persisted or shared across instances datahaven-bsp | 2026-01-08 12:15:37 Loaded 0 BSP peers from database datahaven-bsp | 2026-01-08 12:15:37 Successfully initialized BSP peer manager datahaven-bsp | 2026-01-08 12:15:37 Download state store path: /tmp/storagehub/storagehub/download_state/ datahaven-bsp | 2026-01-08 12:15:37 Starting BSP tasks datahaven-bsp | 2026-01-08 12:15:37 🔍 Discovered new external address for our node: /ip4/37.187.93.17/tcp/30333/ws/p2p/12D3KooWQ3fycKkf4X8qgoj4Kd6QSQEiWBD5tPhPPSkzK9KYVW95 datahaven-bsp | 2026-01-08 12:15:38 📩 Finality notification #20: 6a97183553c2aa8aae5434ea97432c6bbe7176480169e5e3e5edc0dd2ee8a6ca datahaven-bsp | 2026-01-08 12:15:38 📨 Finality notification #20: 6a97183553c2aa8aae5434ea97432c6bbe7176480169e5e3e5edc0dd2ee8a6ca processed successfully datahaven-bsp | 2026-01-08 12:15:38 🥩 BEEFY pallet available: block 20 beefy genesis 1 datahaven-bsp | 2026-01-08 12:15:38 🥩 Loading BEEFY voter state from genesis on what appears to be first startup. Starting voting rounds at block 1, genesis validator set ValidatorSet { validators: [Public(03de718d0dd28420fe4681194ac16598d58badda4767d05ed26dd5a225c43b80bc (KWDjyMyD...)), Public(03b1bce327cc5a6bab48076fe23163d2e13330a3bc98d321334d79caac1a4c1254 (KWCjMb1H...)), Public(03f86ecde6e1aa53c1719c55b3cc08b2f8fb5a7767388fc13bcb0f211c7861c6e5 (KWEL3nrb...)), Public(026df2c83423bc12dc3bc1fe849064ad4595f1f2a9bd8dc82d56bd82d5b42c9209 (KW5Qp5jv...)), Public(036005f2817bf46a02490620bb8235bf216b8de4bfae1aaa3c896ac5edb8ea1475 (KWAtDN4R...)), Public(02563aad0212a4837f638775e6e7f505bbb7e61df67612b75fd64a9e3b167230b9 (KW4siHnY...)), Public(02b414bafec593f10182d1d905739de35eb212b14e843310cb52694b5f656ff07e (KW6zmX51...))], id: 0 }. datahaven-bsp | 2026-01-08 12:15:38 🥩 run BEEFY worker, best grandpa: #20. datahaven-bsp | 2026-01-08 12:15:38 🥩 Concluded mandatory round #1 datahaven-bsp | 2026-01-08 12:15:39 📩 Finality notification #512: 0de8dbc636bff213da9cd1939032f6df388ebea282541d87388c7c821887b6d7 datahaven-bsp | 2026-01-08 12:15:39 📨 Finality notification #512: 0de8dbc636bff213da9cd1939032f6df388ebea282541d87388c7c821887b6d7 processed successfully datahaven-bsp | 2026-01-08 12:15:40 📩 Finality notification #1024: ad779944677ce4318d238efeb423966114bace0956adc9cf6faee7a98c32e5ba datahaven-bsp | 2026-01-08 12:15:40 📨 Finality notification #1024: ad779944677ce4318d238efeb423966114bace0956adc9cf6faee7a98c32e5ba processed successfully datahaven-bsp | 2026-01-08 12:15:40 🥩 New Rounds for validator set id: 1 with session_start 564 datahaven-bsp | 2026-01-08 12:15:40 🥩 Concluded mandatory round #564 datahaven-bsp | 2026-01-08 12:15:41 📩 Finality notification #1536: 4b1060718ed87bae983f9f55e32bd17bd5fec0127a8861e4ad19db7e26e7f681 datahaven-bsp | 2026-01-08 12:15:41 📨 Finality notification #1536: 4b1060718ed87bae983f9f55e32bd17bd5fec0127a8861e4ad19db7e26e7f681 processed successfullyWhat these logs tell you:
- Your node is running on the correct network with the identity derived from your node key.
- Storage provider started.
Starting as a Storage Provider. Storage path: Some("/data/storage"), Max storage capacity: Some(32212254720), Jump capacity: Some(5368709120)- Max storage capacity: 32,212,254,720 bytes (~30 GiB)
- Jump capacity: 5,368,709,120 bytes (~5 GiB)
-
External address discovered (multiaddress).
Note
This is your node's multiaddress and you will use it as a param while verifying the BSP node on-chain later.
-
Node started syncing with network.
- Target: Current chain head (#1,021,251)
- Best: Blocks downloaded so far (#1,611)
- Finalized: Blocks confirmed as final (#1,536)
- Peers: 7 connected nodes
Your node will catch up over time. Once
bestreachestarget, you're fully synced.
Useful Docker Commands
A collection of helpful Docker Compose commands you’ll use while developing or debugging your BSP node:
- Run the container in the background.
- Stop and remove the container.
- Check status and logs while the container is running.
- Continuously tail logs in terminal.
- Continuously display logs in terminal and save them into a file.
- Continuously stream and continuously save all logs into a file.
Inject the BSP Blockchain Service Key
The node has a keystore directory. BSP nodes need the blockchain service key injected into the node's keystore. The key is of type BCSV and scheme ECDSA, which is the same curve scheme that’s used for Ethereum-style keys. That key will serve as your BSP node's "BSP service identity” through which it will sign transactions on-chain.
Prepare BCSV Key
You have two options:
- Use an already existing ECDSA raw seed.
- Generate a completely new raw seed.
Key Scheme Requirement
DataHaven BSPs must use ECDSA keys. If you're bringing an existing seed, ensure it was generated with --scheme ecdsa. Other key types will not work.
Note
If you are a Linux user and can run the datahaven-node binary natively, you can replace docker compose run --rm datahaven-bsp with datahaven-node in the commands bellow.
-
Save seed to
$SEEDvariable: -
Verify the seed was saved:
Insert BCSV Key (ECDSA)
-
Make sure to stop and remove the container by running:
-
Run the following command:
Note
The
--keystore-pathflag is crucial for keeping your keys across restarts.docker compose run --rm \ datahaven-bsp key insert \ --keystore-path /data/keystore \ --chain /testnet-chain-spec.json \ --key-type bcsv \ --scheme ecdsa \ --suri "$SEED"This command writes the resulting key into
/bsp-data/chains/datahaven_testnet/keystoreon your host. You can check if the command was successful by running:The output should look something like this:
ls -la bsp-data/keystore/total 12 drwxr-xr-x 2 root root 4096 Jan 8 12:13 . drwxr-xr-x 4 root root 4096 Jan 8 12:13 .. -rw------- 1 root root 68 Jan 8 12:13 626373780221d669185a2016467e452ee5509ee941ef834c3841cb1590509da14a4e2f288c
Now, you have a running BSP node within an easily maintainable Docker container, with an injected keystore on the DataHaven network you've specified.
Verify BSP Node
This section walks you through the 2-step process of registering your BSP on-chain and verifying that it is eligible to participate in the DataHaven network using the Polkadot.js Apps UI along with DataHaven's public testnet WebSocket endpoint.
Import BSP Account Into Wallet
To proceed with verifying your BSP node, you must have your BSP account funded and ready to sign transactions in your browser.
-
Install in your browser the Talisman wallet if you haven't already.
-
Import into your wallet of choice, the same ECDSA raw seed that you injected into your BSP node's keystore in the Run a BSP Node guide.
-
Fund your account with the required amount of MOCK tokens as defined in the Deposit Requirements section.
Request BSP Sign Up
Trigger the BSP sign-up flow from Polkadot.js Apps to submit the registration request on-chain.
-
On Polkadot.js Apps, open the navbar on the top left, and set your custom
wsUrlto bewss://services.datahaven-testnet.network/testnet.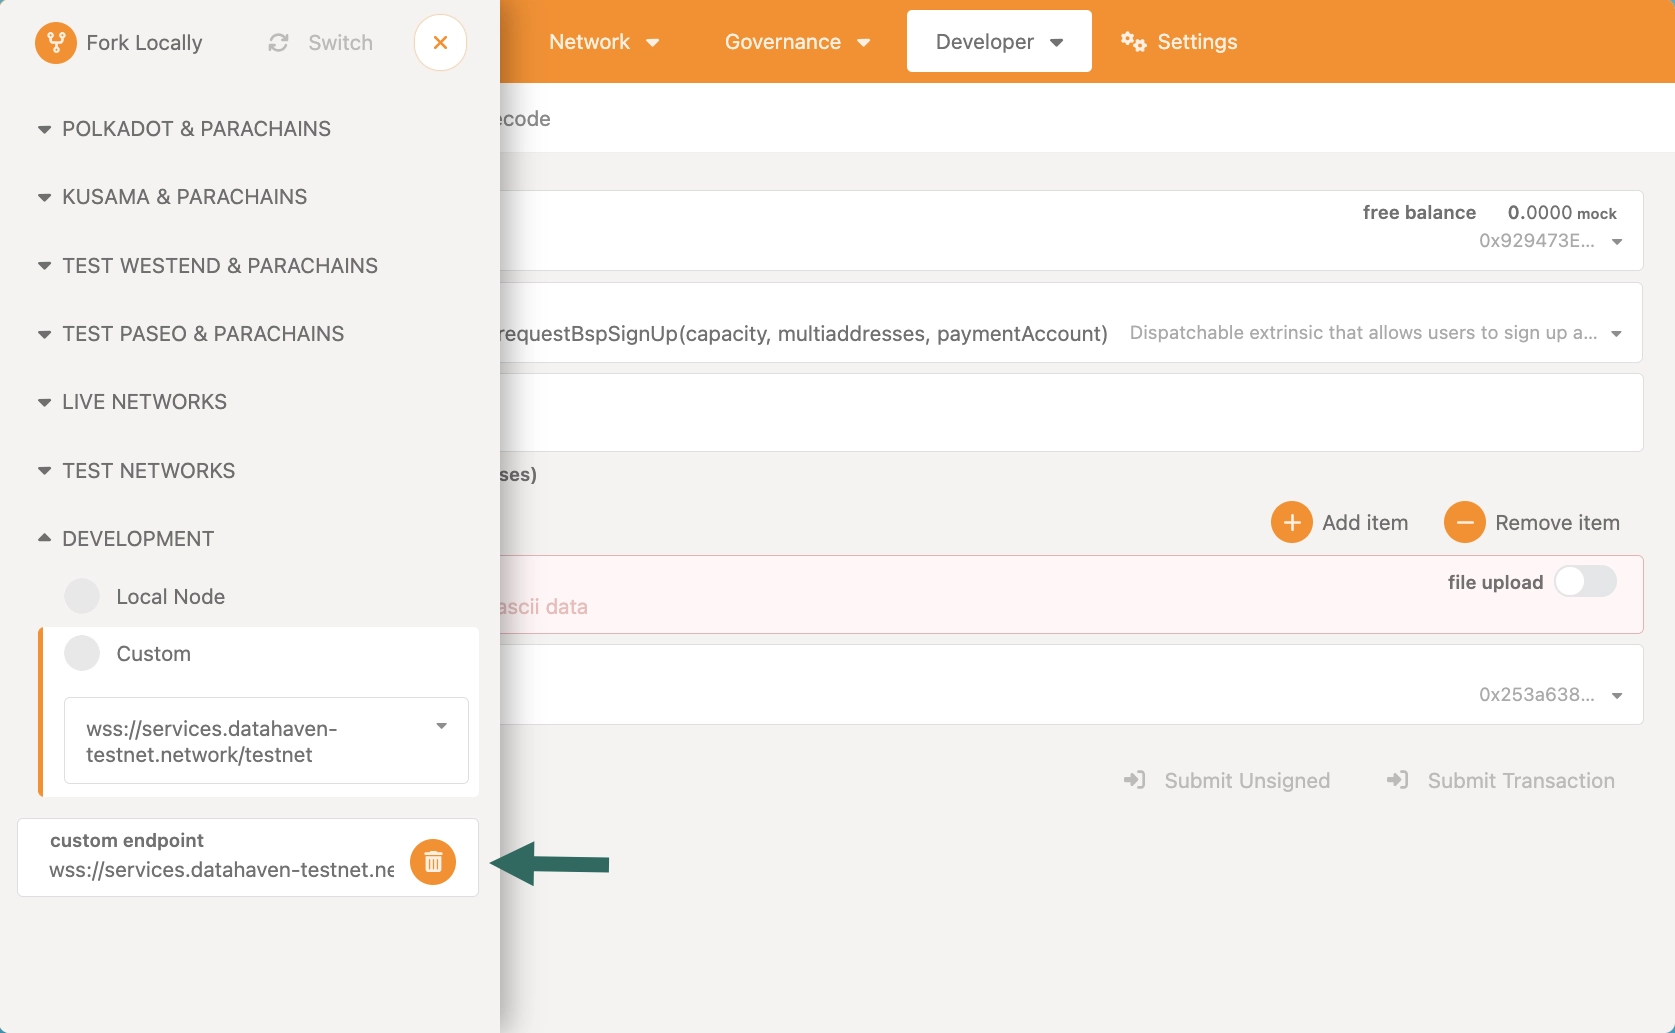
-
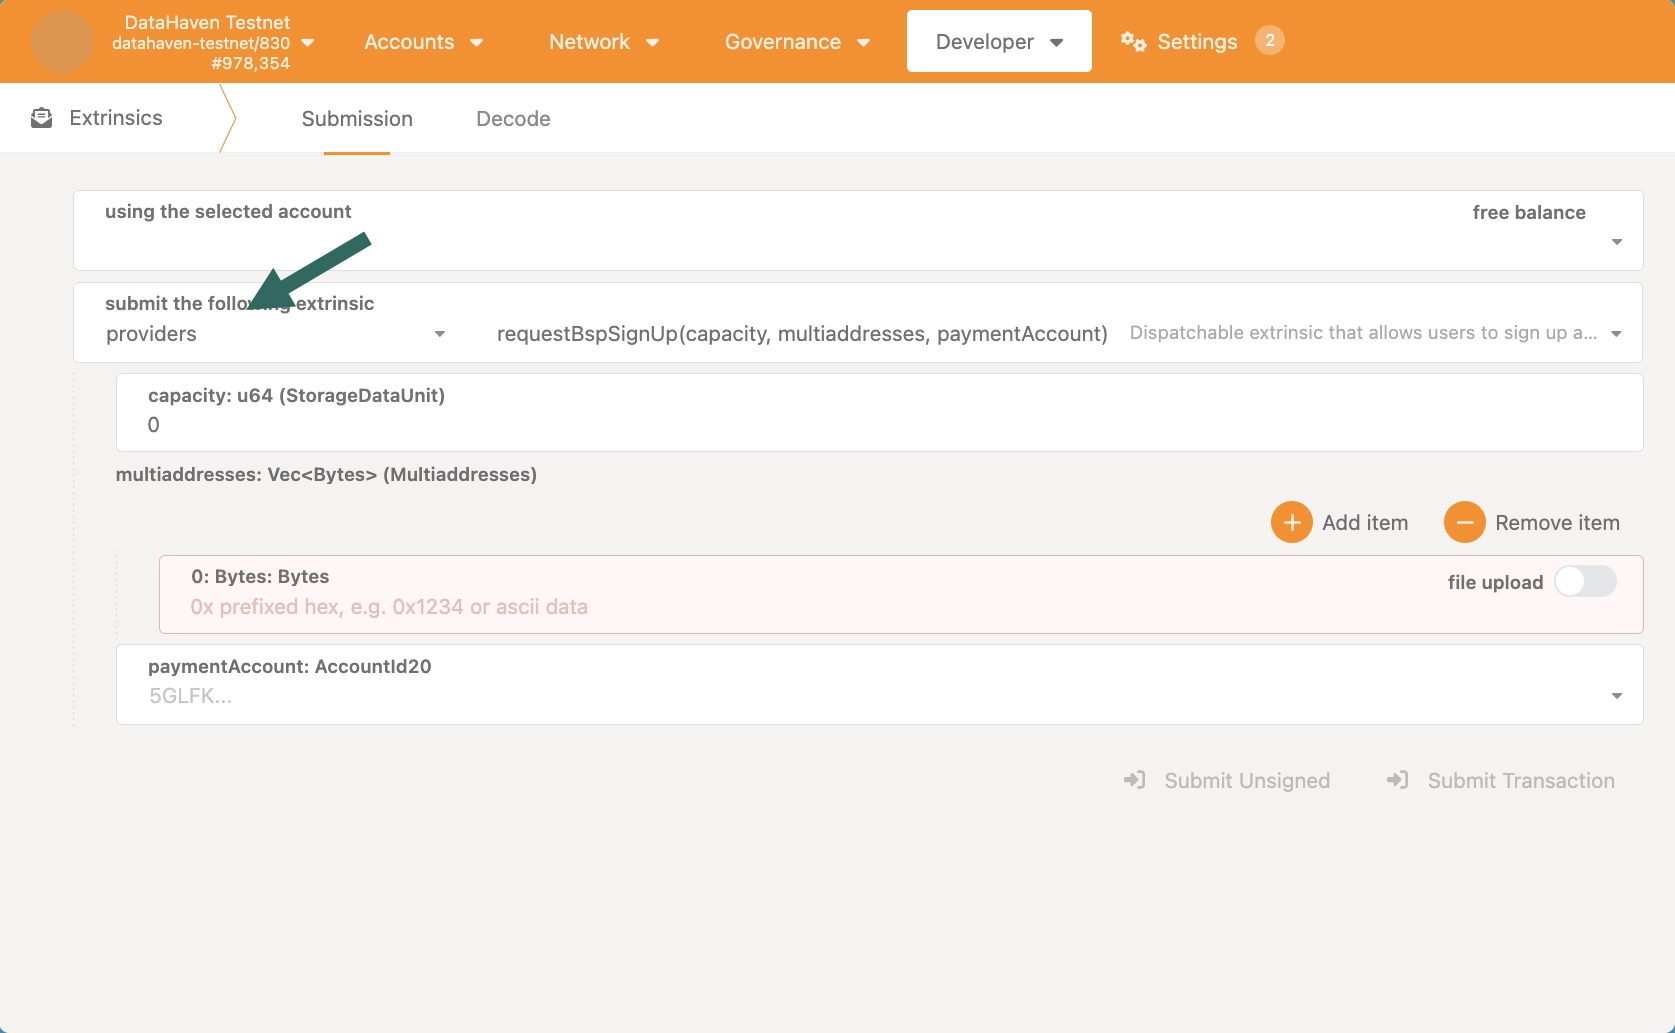
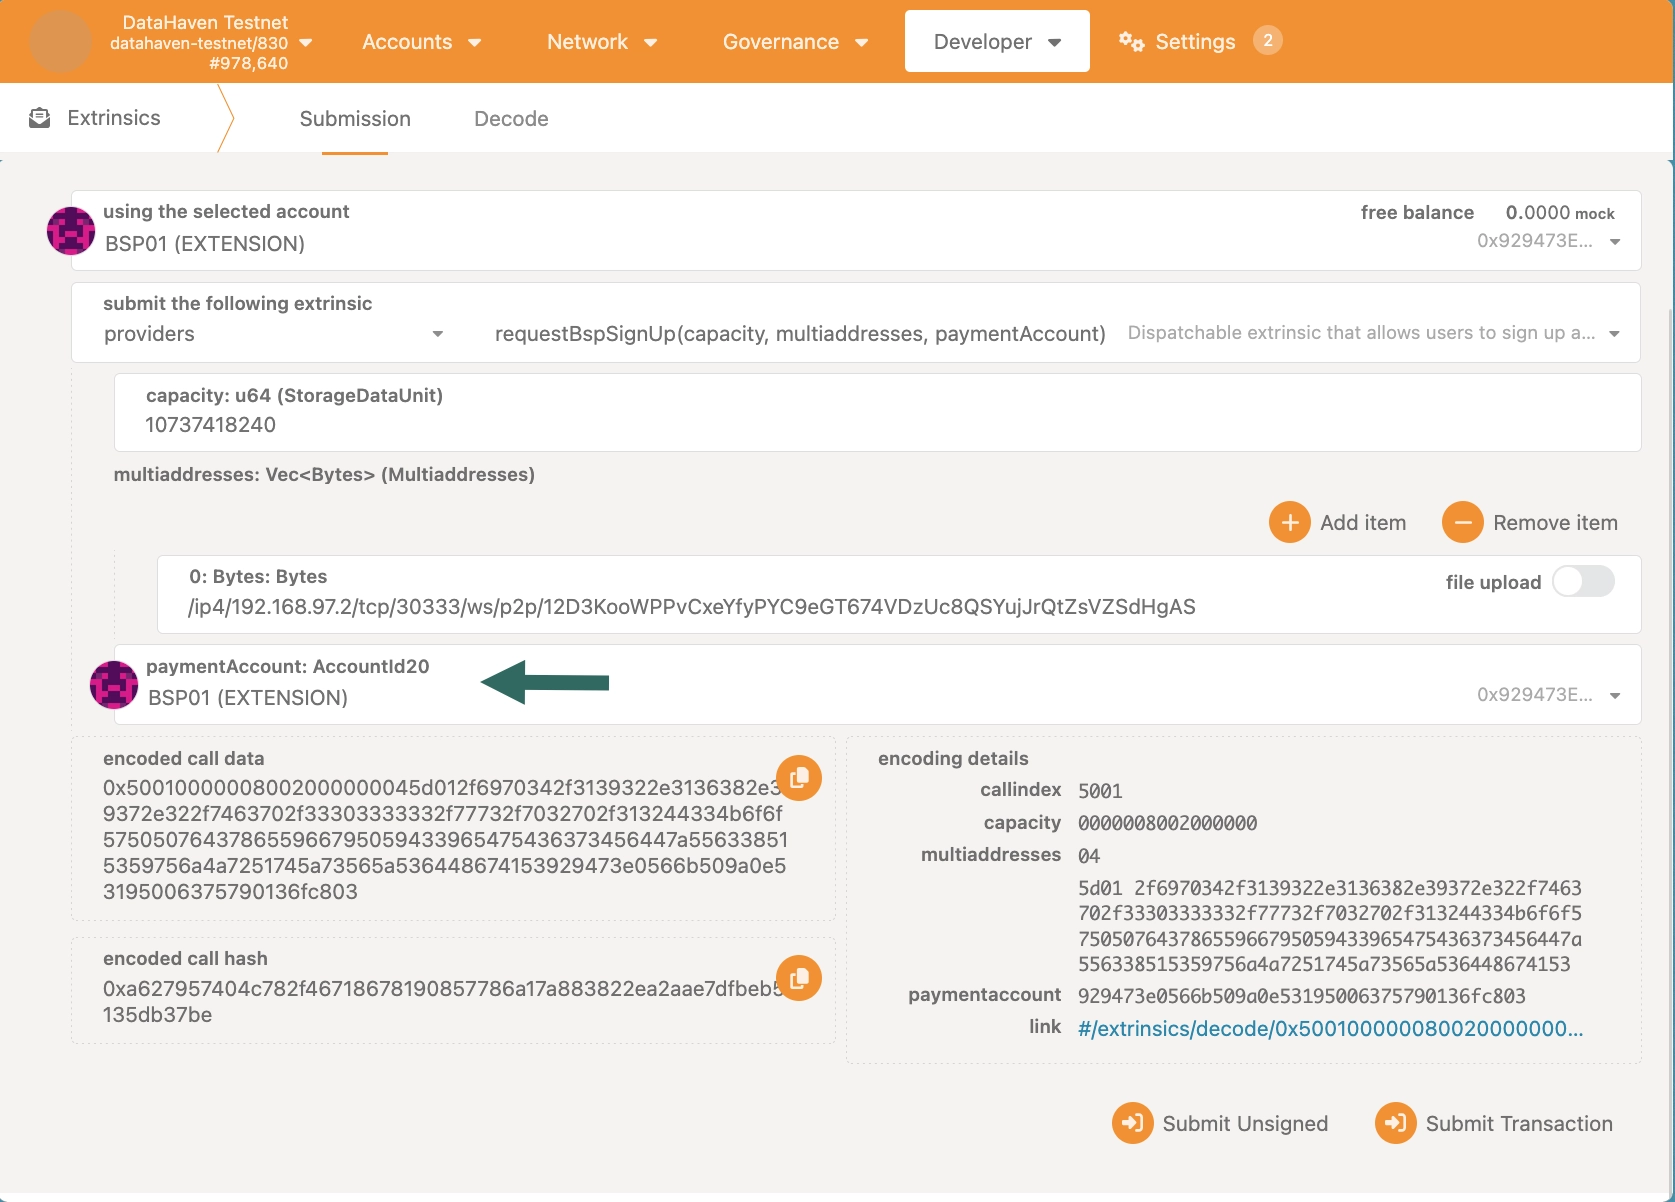
Within the Developer section, go to the Extrinsics page, and select the
providers.requestBspSignUpextrinsic.Three parameters are required to execute this extrinsic:
capacitymultiaddressespaymentAccount
-
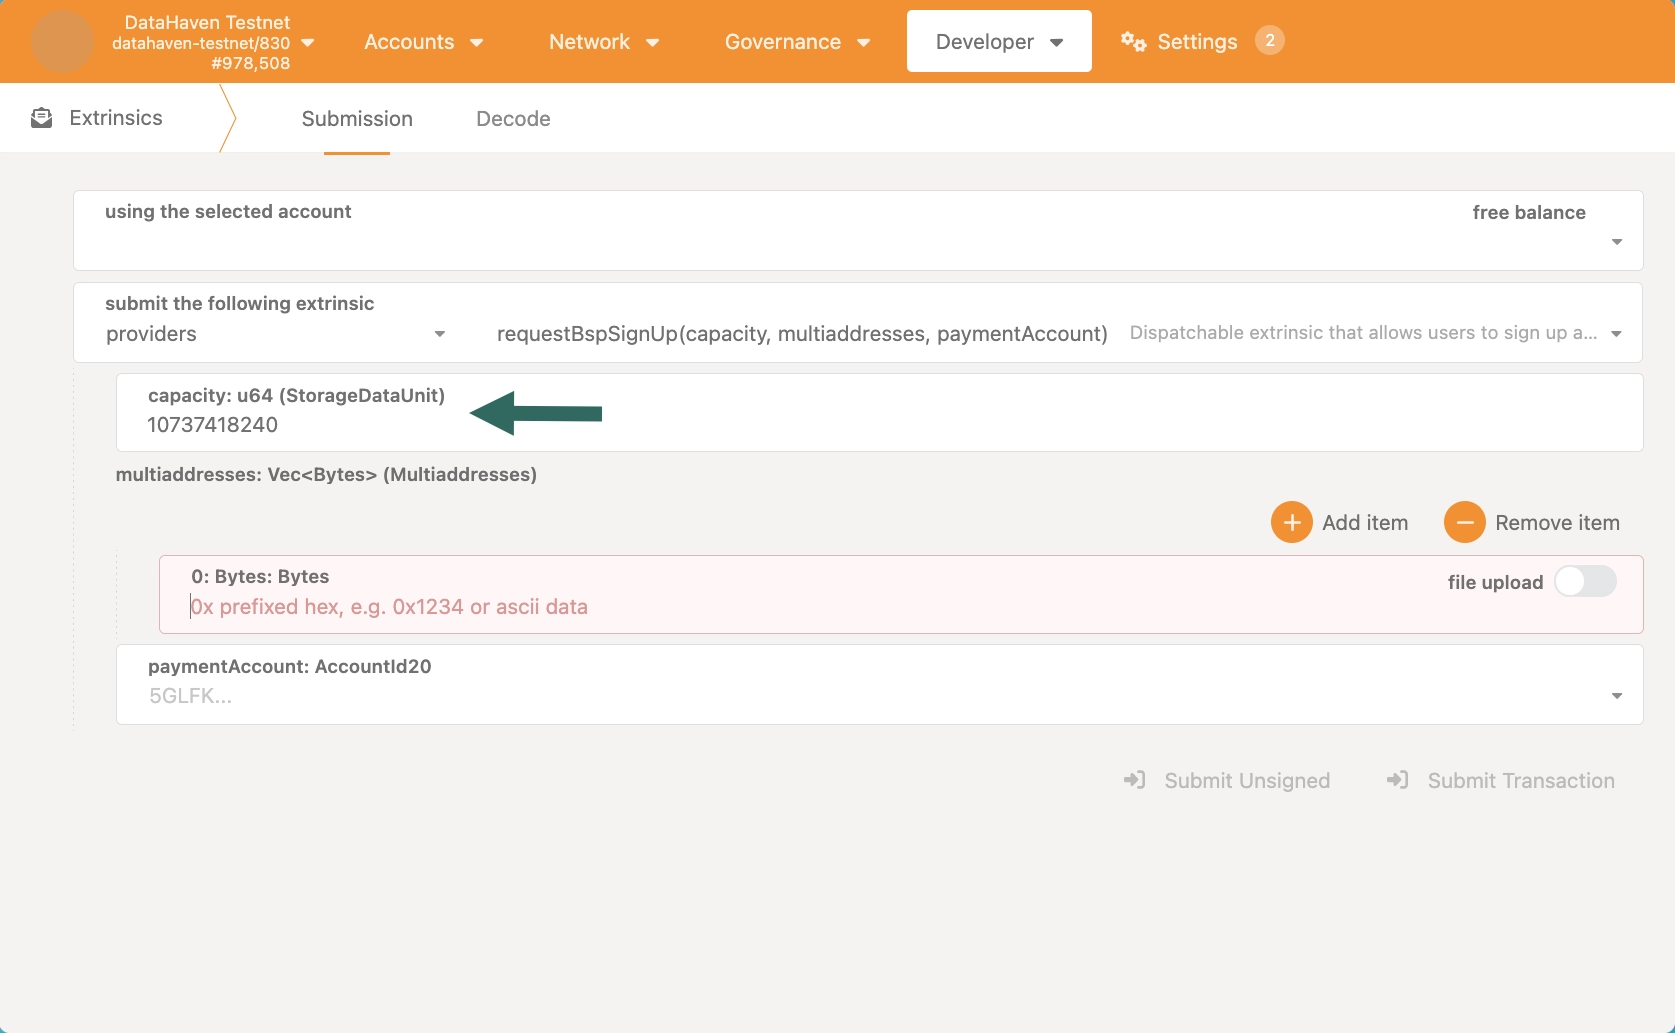
Set capacity based on your machine's capabilities and the hardware requirements provided in this guide.
-
Add your BSP node's multiaddress into the
multiaddressesfield. You can find it in the logs of your BSP node as shown in the Run a BSP Node guide.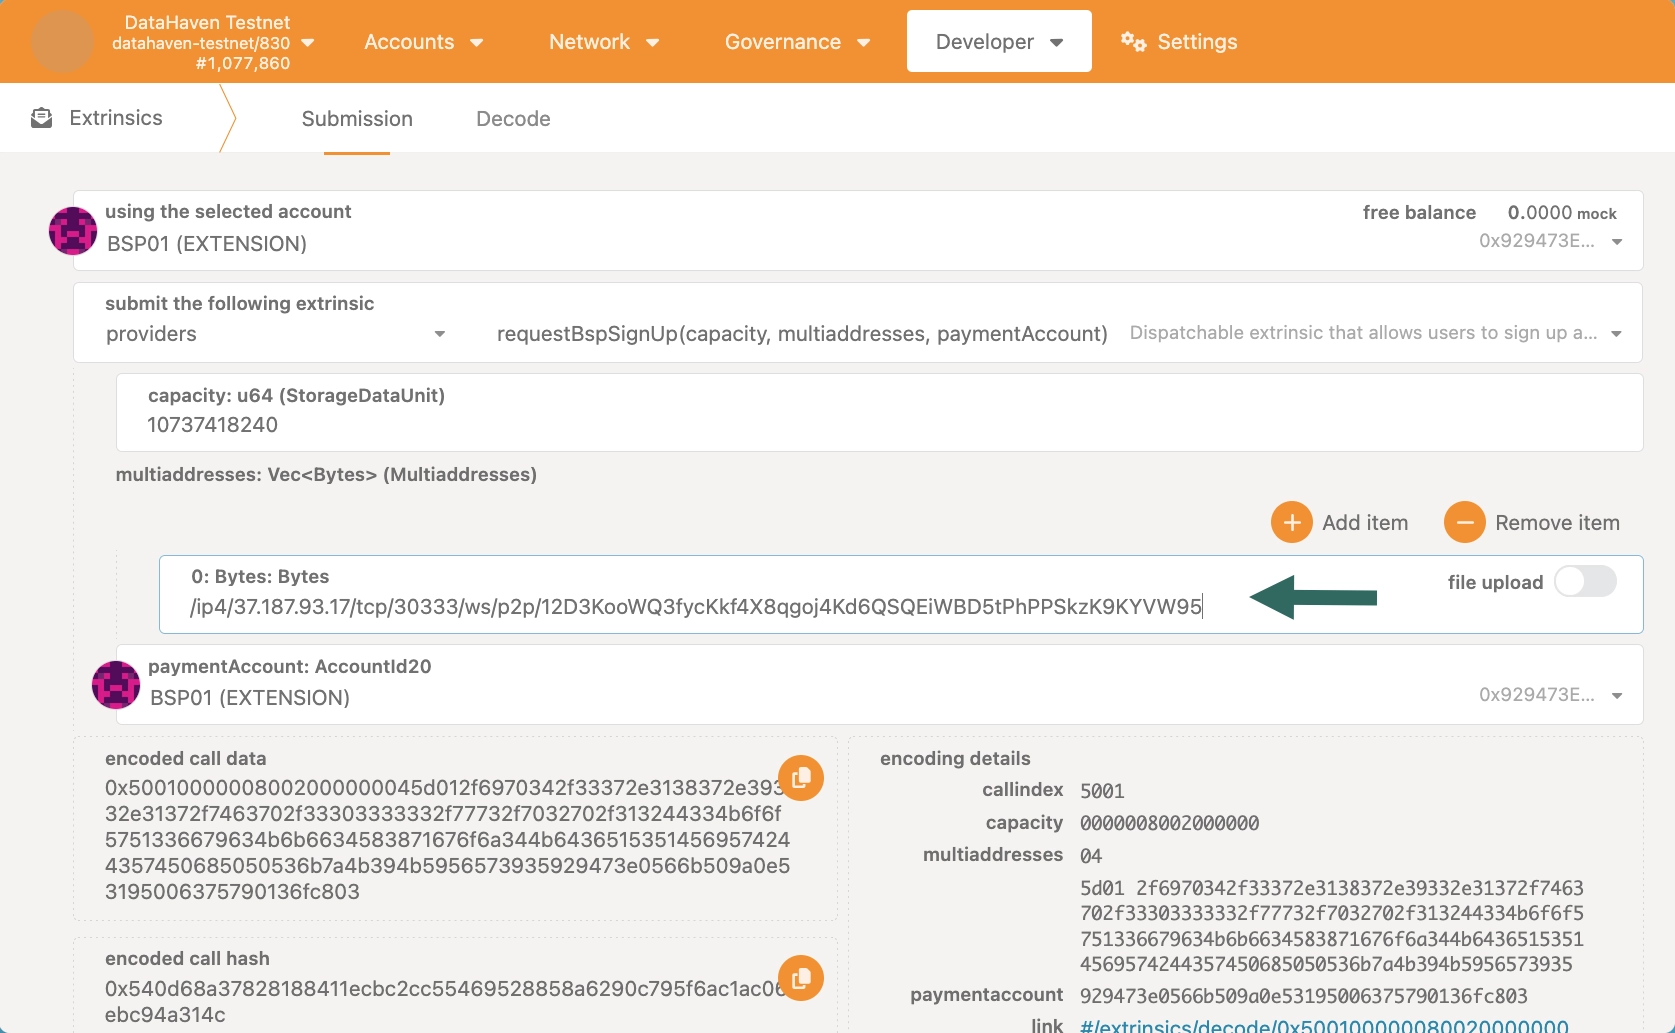
-
Choose a public address on which you want to receive BSP rewards.
-
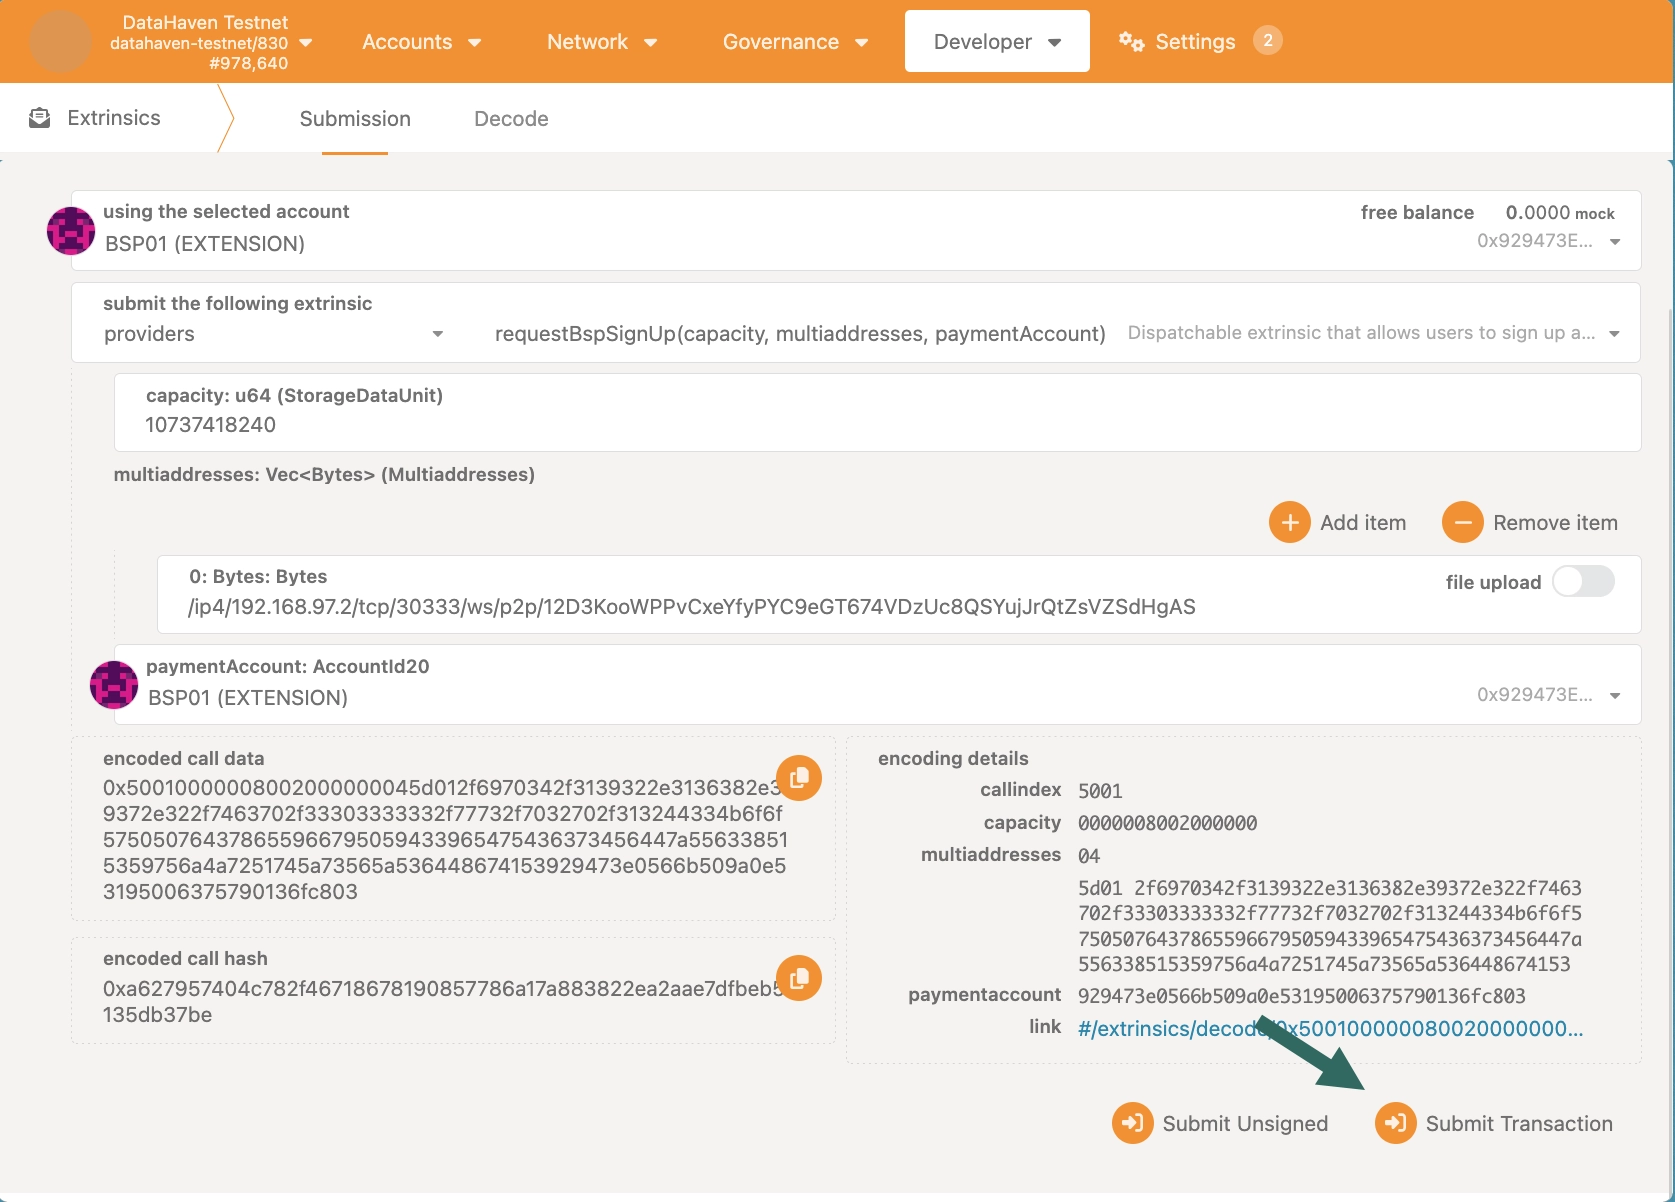
Submit transaction.
Confirm BSP Sign Up
Confirm your BSP registration after the required waiting period has passed. You should only trigger the confirmBspSignUp method after a new epoch has begun. An epoch lasts 1 hour.
-
Check if a new epoch has begun on Polkadot. js Apps' Explorer page.

-
Go to the Extrinsics page, and select the
providers.confirmSignUpextrinsic.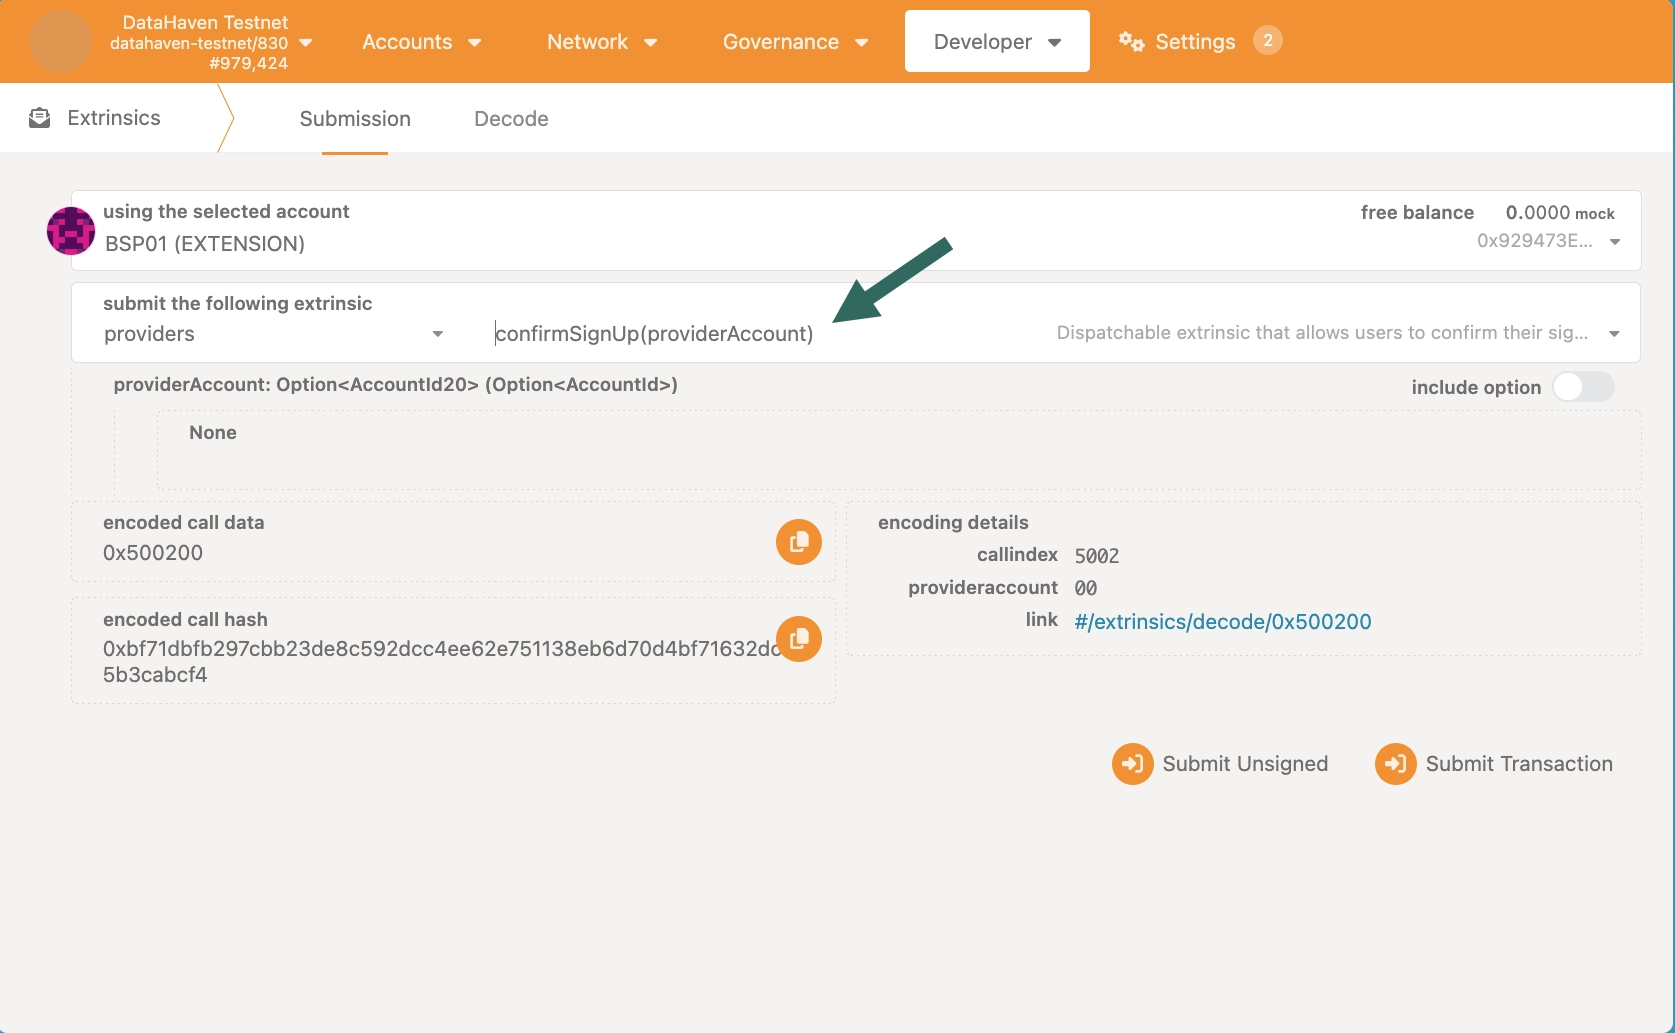
-
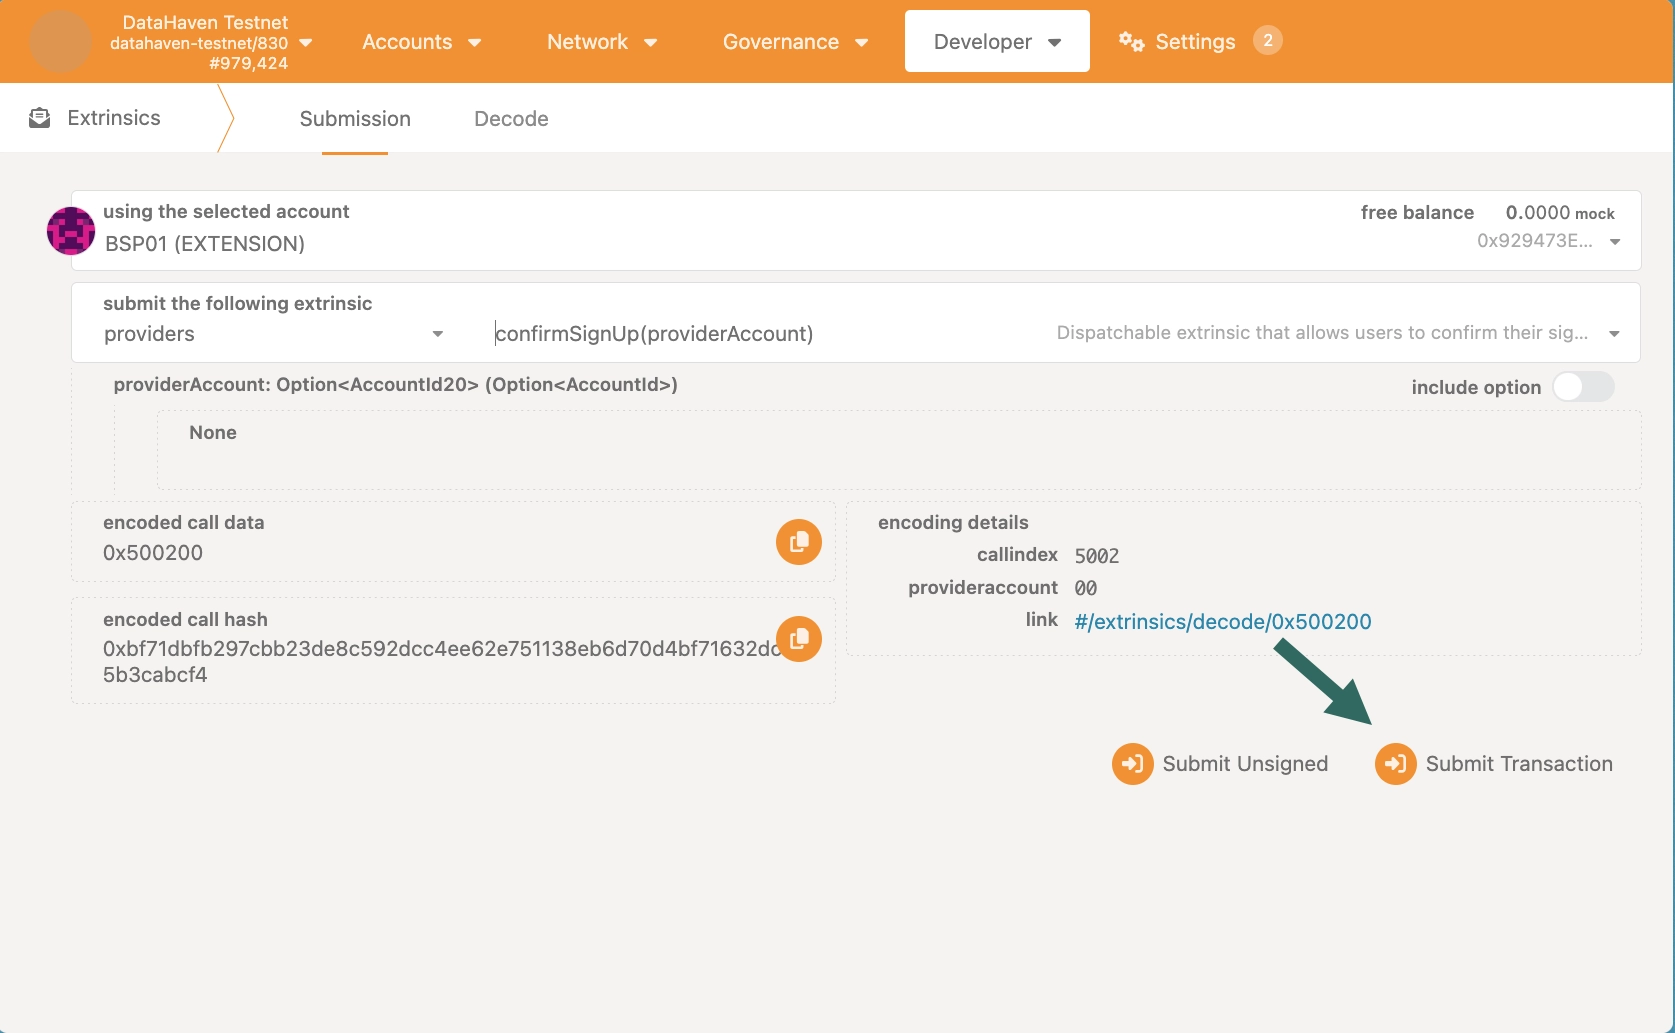
Submit transaction.
Next Steps
| Created: January 14, 2026